FAQ

Search for:  
Start
+News
+Bulletins
+Communication
+DT-970
+DT-X100
+DT-X200
+IT-G500
+IT-9000
-Further Devices
+DT-X5
+DT-X10
-DT-X11
+Downloads / Tools / Patches
+Hardware
+Documentation
+Model Options
+User Interface
+Expansion Slots
+Battery
+Memory Management
+Cradle
+Synchronization
-Imager
+Laser Scanner
+Configuration
+IT-10
+IT-600
+DT-930
+DT-700
+DT-X7
+DT-710
+DT-750
+DT-800
+DT-X8
+DT-800RF
+DT-810
+DT-X30
+DT-900
+IT-2000 E-Series
+IT-300
+IT-3000
+IT-800
+IT-3100
+EG-800
+DT-9000
+IT-70/700
+IT-500
+V-T500
+IT-2000
+PA-2400
+PA-2400W
+Software Development Windows CE & Windows Mobile
+Help
+Contact
Start > Further Devices > DT-X11 > Imager

The DT-X11 can either be equipped with a laser scanner or an imager (CMOS-Camera). You will find an overview with all readable codes in the software manual.


Q: 

Image Scanner Demo

A: 

 You will find a demo program for simple tests and presentations under START, PROGRAMS, UTILITY. The imager can read 1D and 2D barcodes.

In the same registry as the demo program you can find the program Image Scanner Read. This scanner wedge is running invisibly in the background and puts the collected to the respectively actual cursor position. If this wedge is used a complex own development can become unnecessary.


Q: 

Image Scanner Setting

A: 

Extensive settings for the imager can be done under START, SETTINGS, CONTROL PANEL. The settings will be saved permanently in a configuration menu.

The settings are only valid for the imager wedge and own programs. The Imager Demo (see above) does always run with the default setting.


Q: 

Enhanced Laser and Imager Scanner Application 

A: 

As an enhancement to the integrated Imager / Laser Scanner Wedge Application, an Enhanced Laser and Imager Scanner Application ("ELISA") is available with enhanced features such as Bulk Scanning, Aimer Mode, Barcode Filter, Counter Window etc.

ELISA Splash Screen

  ELISA.zip 16.7.2018 Enhanced Laser and Imager Scanner Application 2.26
 
Q: 

Troubleshooting

A: 

Please check the points mentioned below:

  • Use one of the trigger keys to start the scanner.
  • The Scanner-Wedge can only be used when the symbol for the scanner is displayed in the status bar.
  • The scanner only processes codes that have been activated with the matching settings.
  • Please pay attention to the correct reading distance from the scanner to the label (20 – 30cm).
  • Damaged labels cannot be processed by the scanner.
  • The simultaneous use of scanner and camera is impossible


Q: 

Imager doesn't read 6-digit numeric Code 39 Barcodes

A: 

Issue: The Imager doesn't read 6-digit numeric Code 39 Barcodes. All other Code 39 Barcodes (alphanumeric 6-digit, less or more than 6 digits) are working fine.

Reason: Code 39 Barcodes are very similar to the 2D TLC39 Codes from a decoder engine's point of view (TLC39 is a composite Code, composed of a Code 39 and a microPDF417 stacked Barcode, mainly used for telecommunications). For 6-digit numeric Code 39 Barcodes, the decoder engine mistakes this as a TLC39 Code and fails on the decoding attempt.

Solution: Disable TLC39 decoding. This can be done either by calling the function IMGSetTLC39(FALSE); from the CASIO Imager Library, or by performing the following steps:

Tap on [Start]->[Settings]->[Control Panel]->[Imager Setting].

On the "2D" Tab, remove the checkmark before "TLC39" (see screenshot): 

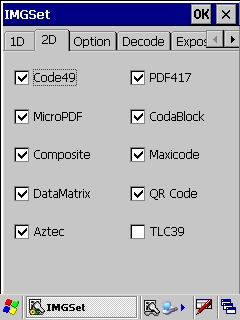
Remark: For testing this solution, please do not use the integrated Image Scanner Demo, since this would enable all Barcode Types again. Instead, please use the Imager Wedge application which can be found at [Start]->[Programs]->[Utility]->[Imager Scanner Read]. To see the barcode reading process, use the Command Prompt Application at [Start]->[Programs]->[Command Prompt].

Cookie settings - Cookie policy - Data protection