|
| Q: | System Menu |
| A: |
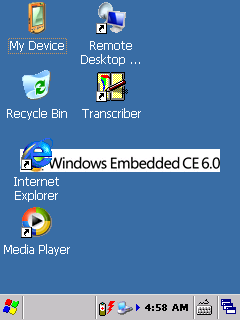
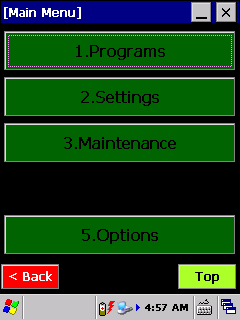
We provide a menu system that hides the standard desktop and provides easy access to commonly used features. It is called "System Menu" and is started by factory default. You can access the menu through either hardware keyboard or touch screen.
When you want to change to the default desktop screen, select the button [X] located at top right corner. And when you want to change this menu screen again, please press reset switch. And if you want to disable the System Menu after system start, go to "5.Options" -> "1.Delete System Menu". Once deleted, you will have to perform "User Disk Clear" operation ("full reset") to restore the device to factory default settings and have the System Menu started automatically again. After executing full reset, all data on your device will be lost! |
| Q: | LED |
| A: |
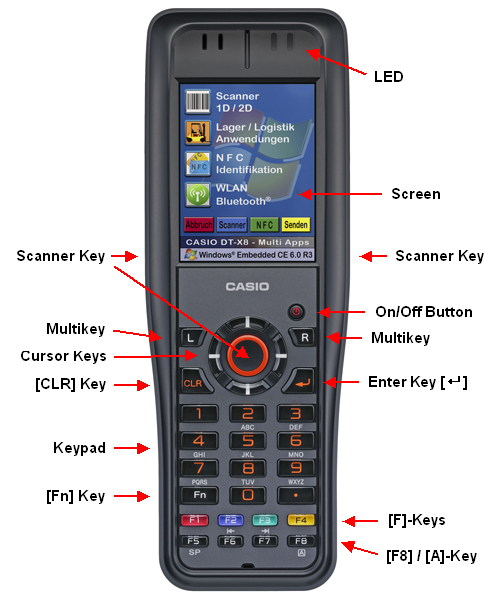
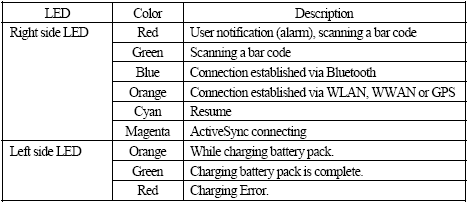
Status indication with left LED for battery (green = fully charged, orange = charging) and right LED for scanner (green = success, red = error), Bluetooth (blue), PC connection (magenta) and WLAN (orange).
|
| Q: | Touchscreen |
| A: |
The screen reacts to touch. The input fields on the screen can either be selected with the input pen or the finger. |
| Q: | Trigger-Keys |
| A: |
The scanner can read data from a label. By pressing one of the trigger-keys the scanner will be activated while the scanner software is running. Further keys can be configured if necessary. |
| Q: | Cursor-Keys |
| A: |
The cursor-keys serve in principle to change between switching surfaces represented on the screen or to move the insert mark in input fields. |
| Q: | Keypad |
| A: |
Via the keypad you enter numbers and letters. To switch between numbers and letters use the key [F8] / [A]. In the status line at the lower edge of the screen the selected input method is shown symbolically. |
| Q: | Enter-Key |
| A: |
With the enter key inputs are finalised. Thus the program is instructed to accomplish the action chosen by you, for example use a selected button or store an entered number. |
| Q: | [CLR]-Key |
| A: |
The CLR-Key ("Clear"-Key) deletes the marked data in an input field, or rather the character left to the cursor. The key combination [Fn] + [CLR] leaves the actual screen if it is a simple dialogue window. |
| Q: | [Fn]-Key |
| A: |
With [Fn] - key additional input functions can be activated. In the status line at the lower edge of the screen the activated [Fn] - key is shown symbolically. By the gradual combination of an [Fn] - key and a further key you will reach the following functions:
| [Fn] + [0] |
Fade in or out the software input panel |
| [Fn] + [1] |
Switch on or off the backlight |
| [Fn] + [2] |
- |
| [Fn] + [3] |
- |
| [Fn] + [4] |
Calibration of the touchscreen |
| [Fn] + [5] |
Darken the backlight |
| [Fn] + [6] |
Brighten the backlight |
| [Fn] + [7] |
Starts a program (full path must be saved to Registry) |
| [Fn] + [8] |
Starts a program (full path must be saved to Registry) |
| [Fn] + [9] |
Starts a program (full path must be saved to Registry) |
| [Fn] + [.] |
Display the character "-" |
| [Fn] + [CLR] |
Output the functional character ESC |
| [Fn] + [F7] |
Switch on or off the keyboard light |
These key combinations are pre-installed and can be partly deactivated via the Registry. |
| Q: | [F]-Key / [A]-Key |
| A: |
The F-Keys [F1] to [F8] are related to the following functions:
| [F1] |
Menu (ALT, or VK_MENU respectively) |
| [F2] |
Back-Tabulator (VK_SHIFT + VK_TAB) |
| [F3] |
Tabulator (VK_TAB) |
| [F4] |
Function Key F4 (VK_F4) |
| [F5] |
Space Key |
| [F6] |
Left Cursor |
| [F7] |
Right Cursor |
| [F8] / [A] |
Switching Input Mode |
By using our System Library API you can assign other key codes, e.g. the real key codes from F1 to F8. |
| A: |
On some devices from CASIO, functions keys are mapped to special functionality in order to provide easy navigation. This sample application remaps hardware keys F1 to F8 and assigns key codes "F1" to "F8". As a result, functions keys can be used as they are labeled, e.g. for terminal emulation. |
| |
FKeyMapper.zip |
16.05.2018 |
App to map Function Keys to F1 - F8 (Windows Embedded CE) |
1.01 |
|
|
| |
| Q: | Key Assignment |
| A: |
Our SDK provides functions to modify the key assignment, e.g. to make country-specific settings. For that purpose you can call the method "SysSetUserDefineKey" from within your own application. |